The Genesis of a Crafter: An In-depth Analysis of Foundational Crochet Tools and Stitches
The art of crochet, a process of creating textiles by using a hook to interlock loops of yarn, is a craft built upon a surprisingly simple foundation. For the aspiring beginner, the journey from a simple skein of yarn to a finished fabric is paved with a few essential tools and a mastery of fundamental stitches. A thorough understanding of the initial equipment—the hook and yarn—and the primary trio of stitches—the chain, single crochet, and double crochet—forms the bedrock of all future creative endeavors. This report delves into the critical details of these basics, providing an academic and practical framework for embarking on a successful crochet practice. It will explore the nuances of tool selection, the mechanics of stitch formation, and the structural implications of each foundational technique, offering a comprehensive guide for the novice artisan.
Section 1: The Symbiotic Relationship of Hook and Yarn
The initial selection of tools in crochet is a critical decision that profoundly impacts the learning curve and the quality of the final product. The two indispensable items are the crochet hook and the yarn, and their relationship is symbiotic; the characteristics of one directly influence the choice of the other. For beginners, a medium-weight yarn, classified as size 4, worsted, or aran weight, is overwhelmingly recommended. [1][2] This thickness is substantial enough to be easily manipulated and allows for clear visibility of individual stitches, a crucial factor when learning. [3] Fiber choice is also paramount. Acrylic yarn is often suggested for novices due to its affordability, wide color availability, and ease of care, as it can typically be machine washed and dried. [4][5] Cotton is another excellent choice, known for its softness and absorbency, making it ideal for items like dishcloths. [6] Wool offers natural elasticity and warmth, but some beginners may find it requires more careful handling. [6] Smooth-textured, light-colored yarns are preferable to dark or highly textured novelty yarns, which can obscure the stitch anatomy and make it difficult to identify where to insert the hook. [6]
The crochet hook is the artist’s primary instrument, and its selection warrants careful consideration. Hooks are available in materials like aluminum, plastic, bamboo, and those with specialized ergonomic handles. [4][7] Aluminum hooks are frequently recommended for beginners because their smooth surface allows yarn to glide effortlessly, facilitating an even rhythm. [7][8] Conversely, some find bamboo or plastic hooks offer more grip, which can be helpful but may also slow down the process if stitches are made too tightly. [7] The most significant development in hook design is the ergonomic handle, engineered to reduce strain on the hand and wrist. [9][10] These hooks feature larger, often soft-grip handles that support a more natural hand position, which can prevent the fatigue and pain associated with repetitive motions, making them a worthwhile investment for those planning to crochet for extended periods. [11][12] Hook size, denoted by millimeters or a letter/number system, must correspond to the yarn weight. [4][13] A size H-8 (5mm) hook is a versatile starting point that pairs well with the recommended worsted-weight yarn. [14] Using a hook that is too small for the yarn will result in a stiff, dense fabric, while a hook that is too large will create a loose, holey fabric.
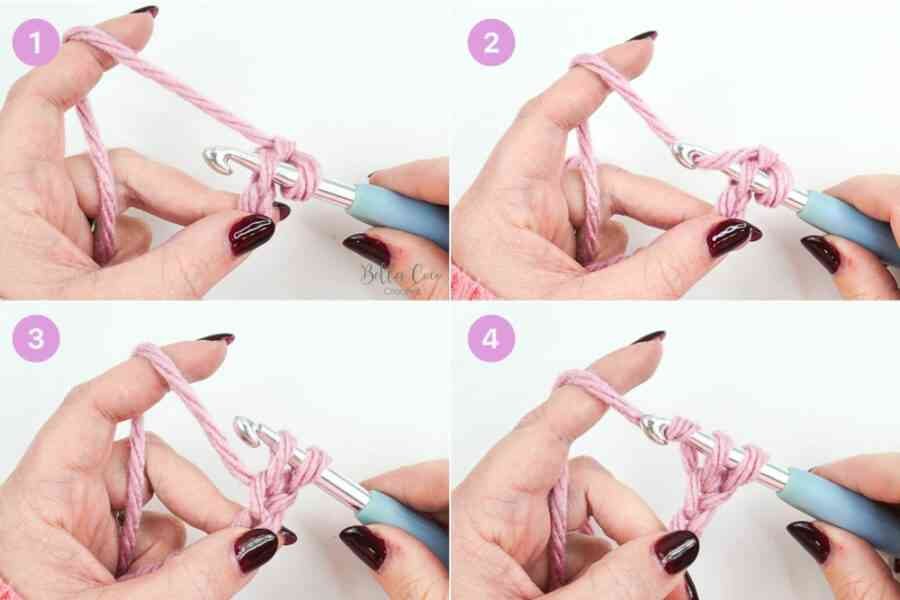
Section 2: The Foundation Trio: Slip Knot, Chain, and Tension
Every crochet project begins with the creation of a slip knot and a series of chain stitches, which together form the foundation chain. [15][16] The slip knot is the adjustable loop that secures the yarn to the hook, and its creation, while simple, is a critical first step. [15][17] A common method involves forming a loop with the yarn, inserting the hook through the loop to grab the working yarn (the strand connected to the ball), and pulling it through to form a new, adjustable loop on the hook. [15][18] This knot should be snug enough to stay on the hook but loose enough to slide easily along its shaft. [16] Once the slip knot is in place, the chain stitch (abbreviated as ch) is formed. This is accomplished through a repetitive motion called a “yarn over” (yo), where the working yarn is wrapped over the hook from back to front, and the hook is then used to pull this new loop through the existing loop on the hook. [16][19] Each repetition creates one chain, and a series of these forms the foundation chain. [16] The loop on the hook itself never counts as a stitch. [15][20]
Integral to creating both the foundation chain and all subsequent stitches is the concept of tension. Tension refers to how tightly or loosely the yarn is held and pulled while forming stitches. [21][22] Inconsistent tension is a hallmark of a beginner’s work, resulting in a fabric with uneven stitches—some tight and small, others loose and large. [22] Achieving consistent tension is a matter of muscle memory developed through practice. [21] The non-dominant hand plays a crucial role, guiding the yarn and regulating its flow. [18][21] Experimenting with different ways of wrapping the yarn around the fingers can help find a comfortable method that allows the yarn to glide smoothly without being too tight or too loose. [21] A common beginner mistake is creating a foundation chain that is much tighter than the subsequent rows of stitches, causing the bottom edge of the work to pucker. A practical tip to avoid this is to work the foundation chain with a hook that is one size larger than the one used for the rest of the project. [23] Maintaining even tension from the very first chain is fundamental to producing a uniform, professional-looking fabric. [21]
Section 3: Building the Fabric: Single and Double Crochet
Once the foundation chain is complete, the fabric is built using core stitches. The single crochet (sc) is the most fundamental of these, creating a dense, tight, and relatively stiff fabric. [20][24] This stitch’s structure makes it ideal for projects requiring sturdiness, such as amigurumi (crocheted toys), bags, and placemats, as it leaves very few gaps. [24][25] To execute a single crochet, the hook is inserted into a chain (typically the second chain from the hook to begin the first row), the yarn is pulled through to create a loop (leaving two loops on the hook), and then the yarn is pulled through both of those loops. [26][27] To begin a new row of single crochet, a “turning chain” of one chain stitch is made. [20][28] This single chain brings the yarn up to the correct height for the next row of stitches. [29][30] For single crochet, this turning chain typically does not count as the first stitch of the new row, so the first single crochet is worked into the very first stitch of the row below. [20][31]
In contrast, the double crochet (dc) stitch is significantly taller, approximately twice the height of a single crochet. [32][33] This height difference means it creates fabric much more quickly. [24][34] The resulting textile is looser, lighter, and has more drape and flexibility than a single crochet fabric. [24][35] This makes it well-suited for items like blankets, shawls, and garments where a softer, more flowing material is desired. [24][32] The creation of a double crochet involves an extra “yarn over” at the beginning. The process is: yarn over, insert the hook into the stitch, yarn over and pull up a loop (three loops on the hook), yarn over and pull through the first two loops (two loops left on the hook), then yarn over again and pull through the remaining two loops. [32][36] To accommodate its greater height, the turning chain for a double crochet row is typically three chains. [14][36] In most patterns, this chain-3 turning chain does count as the first double crochet stitch of the row. [36][37] This means the crocheter will skip the first stitch at the base of the chain and work their next double crochet into the second stitch of the row below. [32][36] Understanding this distinction in how turning chains are treated is crucial for maintaining straight edges and an accurate stitch count in any project. [36][38]